Dependency Management in R and Python
Flavio Hafner
2025-01-30
Overview
Link to slides

Why track dependencies
- You want your code still to run in 2 years
- Functionality change; bugfixes
- A project might depend on the specific version of a package
- Other projects could use newer versions
- Make your tools portable
- For yourself
- For your co-authors
The high-level idea
| DIY Project | R/Python Project |
|---|---|
| 🏪 Hardware store | Repository (CRAN, PyPI) |
| 🗄 The storage shelf in your garage | The folder with Python/R libraries |
| 🧰 Toolboxes (the drill box, the box of screwdrivers) | Packages (ggplot2, etc.) |
| 🪑 Workbench | Environment: renv, venv |
The environment is an isolated workspace with all tools
- An environment is defined by a file with metadata on
- Which packages, which versions
- From where (repository, github)
- Metadata are stored in requirements and lock files
- \(\Rightarrow\) Recreate the dependencies in the same way
- This metadata should be under version control
- So that you can track changes and share with others
R: Using renv
Create a new project in RStudio
- Create new project with version control (git)
(File -> New Project -> Version Control -> Git)
- Open the project in a new session
Install and track packages with renv
This creates
renv/– A new folder that serves as the library of packages for your project..Rprofile– This file makes sure that oncerenvis turned on for a project, it stays on.
Create lock file to log project state
yields something like
{
  "R": {
    "Version": "4.4.2",
    "Repositories": [
      {
        "Name": "CRAN",
        "URL": "https://cloud.r-project.org"
      }
    ]
  },
  "Packages": {
      "rlang": {
      "Package": "rlang",
      "Version": "1.1.4",
      "Source": "Repository",
      "Repository": "CRAN",
      "Requirements": [
        "R",
        "utils"
      ],
      "Hash": "3eec01f8b1dee337674b2e34ab1f9bc1"
    }
  }
}
The lock file records dependencies only when used in scripts
Restoring and checking
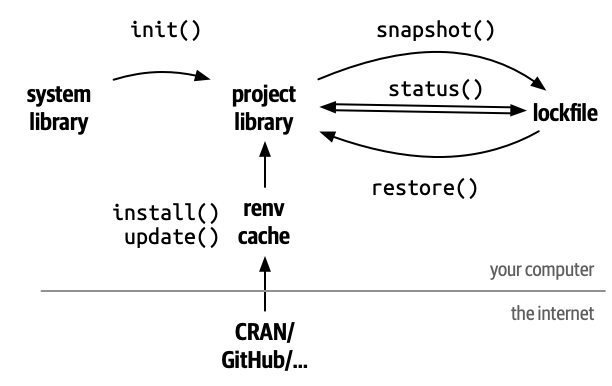
Source: rstudio.github.io
Python: Using venv and pip
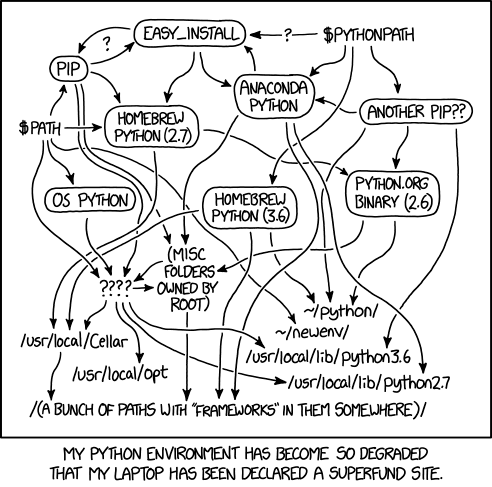
Python Environment Hell from XKCD (Creative Commons Attribution-NonCommercial 2.5 License)
Overview
- PyPI is the Python Package Index, the analogue to R’s CRAN
- But CRAN reviews submissions while PyPI does not
pipis the Python package manager and interacts with PyPI- Other tools do the same job
pip+venvare available by default for Python 3.3+
Getting started
Use the command line: a terminal or from an IDE (VS Code)
Creating the virtual environment
What does this do?
- Creates a folder
venvto which packages are installed - (The
-mflag calls themainpart of thevenvmodule)
Install packages with pip
Creating requirements.txt files
We can inspect the file
PyPI vs conda
| PyPI | conda |
|---|---|
| Easy to use & create packages | Not only Python, can use external libraries |
| Does not track Python version | Tracks Python version |
| Complicated with external libraries | Heavy – use miniconda/mamba; packaging is harder |
… And try to keep them apart whenever possible
Conclusion
Good practices
- Have the environment inside your project directory
- In Python, keep your base environment clean
- When adding new dependencies, do not pin versions:
- But keep track of exact versions in lock file and commit often
- Share with your co-authors
Other considerations
- Adding dependencies is always a make-or-buy decision
- Don’t reinvent the wheel?
- Before adding dependencies,
- Make sure they work as intended
- Check if they are maintained and the size of the user base
- Be aware of security risks
References & further reading
For R:
- TSB Research Support Team: Intermediate R
- RStudio: Introduction to renv
For Python:
- Code Refinery: Reproducible environments and dependencies
- Intermediate Research Software Development with Python: Virtual environments
Hands-on: ideas
- Start using an environment for an existing project
- Play around in a dummy project
- If you’re using
piporconda, try the other, or tryuv
- If you’re using